|
After going in-depth to camera settings and how they all work together to create a thought out picture, I feel I will be able to better understand how to incorporate this into 3D modeling. 3D simulated cameras include aperture, ISO, and shutter speed just as a camera irl. However, being able to test out these aspects in real time with a camera can be very useful in one's understanding of the concepts. Something interesting about these settings is how they all affect exposure, and can be used strategically to provide an image with the wanted exposure. Integrating these concepts with lighting which we previously covered, we can create more atmospheric, finished, and possibly realistic scenes. Going even further in-depth is Bokeh and FoV which are used to blur backgrounds (this is an oversimplification of Bokeh) and field of view can shift the focus, change the impact of certain objects, and change the tone. Utilizing these, we can create complex scenes, and when used correctly, more impactful scenes. 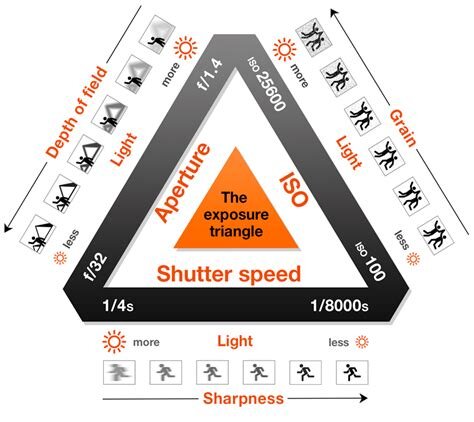
0 Comments
This unit has been all about lighting, which I'm pretty happy about. Lighting is so important in every scene in every game, movie, pretty much any entertainment media, so recreating that into 3d scenes is kinda exciting. So far, we've learned about sun positioners, standard lights, and Arnold lights. My personal favorite has been the Arnold lights because, despite the mildly excruciating render time, the renderer just has more capabilities than the scanline renderers, so the lights look far better and more realistic. My least favorite would have to be sun positioner just because it's the least fun to work with and it feels as though I have less control over it. One thing I've taken away from the past few assignments is how to be able to use multiple different types of light sources in conjunction with one another to create a more well-lit scene. This can be useful because if you want to use standard lighting in your scene, just one of these can look fairly plain and unrealistic, but if you find the right combination of types of standard lights, you can create that complex lighting and elevate your scene further.
So, Darkwood is a top-down horror game that has been available on pc for quite some time, but I believe is now available on consoles such as the ps4. I recently bought the game on steam and with all this time to kill I was able to sink some hours into it. This game is the type of horror that makes you feel, anxious and paranoid, a main proponent of this being the mechanic that limits your full vision to the light emitted from your flashlight. This not only makes thee game more fun to play, but adds to the eerie atmosphere that keeps you in suspense at all times. Another thing I noticed was the use of color in this game was really fitting in every situation. Overall the colors were very dark, however the mood could be changed when the typical blue-toned greys of the night shifted into oranges, becoming closer and closer to red, or even black. The most obvious use of color, though, would be the bright reds used in some situations, not gonna spoil much, but like in the beginning scenes when the moment of suspense is happening, your flashlight, which would have brought security, emits a alarming-looking, bright red light. This bright red is then used again throughout the game. Another thing I enjoyed about this game was the characters. Again, I don't want to spoil so I will only mention the wolf character ad doctor which keep up with the scary game title, however, when we meet the wolf it really provides a sense of security. Overall, this game was hard to play because I was spooked, but it was easy to come back to so I definitely recommend.
In this unit we are working with UVW maps for the first time, and it helps create a very realistic texture to your models. The idea of UVW maps and the tools that go with it can look quite intimidating at first, but the pay-off is definitely worth it! I'd say if you want to take on 3d modeling seriously, then UVW maps would be a must-have tool, and it would be necessary for you to understand it. So far, I've only scraped the very basics of the UVW tools and only know how to apply them at a beginner's level, but I hope to learn more about these tools more in the future. One thing I enjoy about this tool is how it makes it easier to create and apply your own, original textures to your 3d models. While in the past we've only used textures from outside sources, now we can create and design our own textures for use in our models. UVWs can be very complex tools,but by taking it one step at a time, the learning process is worth it.
Nowadays there are an array of free-to-use animating software out there for 2d animators. But what is the best choice for you? In my opinion Grease Pencil by Blender is one of the best to use right now, and has many techniques I believe will make 2d animation production smooth and easy. The way it works is that it allows you to draw your 2d images within the 3d space. The mix of 3d and 2d tools here seem like they would make animating more efficient, and a more enjoyable experience. We can see the usage of typical 2d animation tools like onion skins and strokes, however, tools such as materials, modifiers, and the ways you can edit the objects, using meshes, and sculpting are similar to what you would see in 3d programs. So what does this mean? Well, for 2d artists/animators you can have some of the efficiency of 3d animation in your own 2d work process, while still maintaining a high level of control over your artwork and frames. The only downside that I can think of for using this software would be the possibility of a steep learning curve, and it could take a while to get used to all the tools, but I look forward to learning more about, and using this software.
References:
Today I'm going to bring you a full, in-depth game review and analysis of Raid: Shadow Legends. No, but I did download and I'm going to share my short-lived experience (surprise - it was bad). So we've all seen ads for this "game" no doubt, and it seems like it will maybe be an rpg based game, and the ads flaunt the great gameplay. However, when I got the game I was introduced to just tapping again and again. I thought it could've been worse though, I mean at least there were an array of different skills/abilities. But that thought went away a minute layer when I noticed a button in the bottom right corner with X1, and of course this means auto, but if all of your gameplay can be on autopilot, even at X2 speed, what is the point of playing? I mean, there's nothing to play. Then I deleted it. This well-known game actually reveals a lot of truths about the mobile game industry, though, and how greed and targeting children often overshadows any quality a mobile game could possibly have had in the first place. From the over-the-top marketing, to the gacha based system advertised as "gameplay", even to the game mechanics that don't take any mental capacity and leave you bored and unsatisified. These types of mechanics are also a way to draw people into paying more into the gacha system, because when someone gets bored with what they have in a game, for some the next step is to buy and buy, gambling for the chance at a more interesting character because maybe then you'll have a good time. So, when you see these signs delete, delete, delete, although, you probably already know that if you're reading this, which is why this marketing is typically focused on a much younger demographic, so the companies/developers can trick them into handing over their parents' money without them having a single clue they are being taken advantage of. I don't know if we'll ever see a decline in this type of mobile game development, but I can still hope.
In this unit we learned new, and really interesting topics/techniques for our modeling and animating. This includes MassFX, particle systems, daylight systems, and the cloth modifier. These new tools are extremely useful and I hope to find myself using them a lot more in the future to create more advanced-looking models and animations. Unfortunately though, this comes at price, and that is the difficulty lower-end computers have with these tools. Recently I was able to get 3DS Max on my computer and it handles things semi-smoothly, but the issue comes in when we combine these tools into a single file and attempt to render it. This is really sad to see after we spent the unit learning about these topics, because when put together you can make beautiful, intricate, or complex animations, but if your computer can hardly function during the process the fun is taken out of modeling and you're just left feeling frustrated. After learning my lesson and trying to put too much pressure on my computer, I realize I will have to make sacrifices, even if it is unsatisfying to do so. A world in which you could model anything you want, however you want without 3DS Max crashing sounds great, but it's simply not possible. It's a shame because particle systems and MassFX are able to create realistic movement, but can become too much for many older, less capable computers, such as my own, to handle.
This unit we worked with modeling concepts that are not entirely new to us, such as parametric modeling which we first learned about in DDA I. However, with this class being more independent and with me having a tiny bit of time on my hands I decided to try and work with photogenic lighting tools. These, specifically the free light tool, are quite easy to use despite being fairly intimidating when you first look at them. When using the free light tool, although it depends on what effect you want, most of the time you will want to turn the shadows on for your light otherwise your lights will look very 'unrealistic and out of place. The one issue I had when I was working with this was not an issue regarding the actual tool, but the computer I was working with, so if you don't have a great computer, working with lighting and shadows may take more time than you would expect. I found that even combining lighting and shadows with simple models can bring those models to life. So, if you ever have scene that feels really meh, it doesn't take much effort to add lighting and shadows to make it look much, much better. I enjoy being able to be more independent than I was in the previous DDA course, and am looking forward to learning more concepts.
I think we all know about the fairly recent boom in Minecraft's popularity once again, but this time around it's a little bit different. Back in the early days of Minecraft it was really different from the game it is today. The original creator, Notch, went about updating much differently than the company now owning Minecraft, Mojang. Back when it was owned by Notch features were much more limited than they are today. Since then new biomes, mobs, and other features have been added. I think part of what adds to the recent spike in players of course cn=an be credited to influencers online that have entertained "the youth" with their Minecraft videos, but I think most people who were convinced they should get back on are those who remember the days when turtles, pandas, and polar bears didn't exist yet. All the new features combined with the media recognition are the main reasons, in my opinion that Minecraft is gaining back so many players. And do I think everyone is going to continue playing for a while? No. But I do think if updates like the upcoming Nether Update are being introduced to keep us entertained, then most people will.
|
About meI am a Senior at DSA and currently taking the Advanced Game Art and Design course. I enjoy playing video games and drawing in my free time. The opinions expressed within this blog are my own, and do not reflect that of Durham School of the Arts of Durham Public Schools Archives
May 2022
Categories
All
|

 RSS Feed
