In Summary:
0 Comments
I came up with the idea of a parkour-typing game because in elementary school I distinctly remember typing games in the computer lab, and since typing is one of those things you can only really learn through practice, I thought creating a typing game from the younger demographic would be a good way to create an educational game for them. The narrative/theme itself is going to be based on the player needing to reach the bus on time and the player will do this by navigating the neighborhood (level 1) until they reach a storm drain, jumping down to the sewers (level 2) and at the end of level 2 they will go back up to the surface and once they reach the bus they win. The parkour aspect is self-explanatory, move past the obstacles to reach the end, but the typing aspect comes into play after some obstacles are passed. For example, if the character successfully jumps from one platform to the next, there would be a box collider that would trigger the typing UI to pop up, and they would have to type the word(s) on screen before going back to the actual game scene and continuing the parkour. Coding this may be a challenge considering my C# is not very good and I have no idea how to make a typing game, but I think it could be a good learning experience as well. As for assets I've looked and already found many good free assets from the Unity Asset store that would work well for the level theme, and even mesh well with each other.
In Summary:
My parkour level is a dark, sci-fi environment in which the player attempts to traverse through the various rooms to reach their end goal. The unknown, metallic rooms filled seem to break apart into various floating platforms, thin broken bridges attached to tall cylindrical platforms, in some instances fitting through small spaces, and in others attempting to jump as far as you can reach to make it to the next room. The player will do this by using the typical controls of wasd to move, shift to sprint, ctrl to crouch, and space to jump. There will be floating platforms that differ in position both vertically and horizontally, as well as thin bridges segmented apart. The player begins in a small empty room in front of a downward staircase. The goal is in the final room, on the largest, tallest, platform at the very end of the room.
In this course one of the most important pieces of new information was on how to use Probuilder in Unity. The tools available in Probuilder make the production of levels much smoother, and is reminiscent of 3D modeling programs I have used in the past, especially 3DS Max. The method of using Probuilder to create levels by flipping the normals on a cube and expanding from there in order to keep the player in an enclosed environment is very useful. I think in general the interface of Unity can be difficult at first but the more you work with it, the easier it will be to catch on. None of the content on this course was particularly difficult, considering most of it was not new information, however what was new, Probuilder and the FPS AIO asset, weren't difficult to use, in fact they made working in Unity much easier. This course helped me recall the skills and tools I learned about last year, while also introducing me to a few new ones which made workflow much more efficient.
In Summary:
Right from the beginning being introduced to this mystery island project I knew I wanted to make an arctic island setting. I find the isolation of remote research stations in the Arctic and Antarctic to be really interesting and I think it could be good for a game with an air of mystery. Creating the sketch along with the outpost itself was definitely based off of various research stations I've seen, although I wanted to keep the tones drab rather than colorful as most actual stations are just to keep an almost eerie, unsettling, and lonely feel. From there creating the actual terrain I wanted to have two different islands within sight of one another, the initial island you land at being the location of the outpost and the next being the mountainous region where many of the strange phenomena, ancient relics, and cryptic mysteries would be. I wanted the crescent shape for the mountainous island because it ties in nature with an astral, mystical feel. I was not able to add snow vfx within the time allotted unfortunately, but I look forward to working more with that in the future on my own time.  I would fit the role of 2D artist well because I already have prior interest/experience in 2D art, both digital and traditional. I understand software such as Photoshop and Illustrator, and if we ever have school licensing issues with Adobe CC I also have experience and access to the free alternative, Krita. I have a decent understanding of the tools and software to create the artwork, but also the concepts such as anatomy. Creativity is one of the most important aspects of this role as well, and I would like to consider myself a creative person. I would be able to complete the expected responsibilities listed in the graphic because when I have an artistic idea, I am motivated to bring it to life. I have experience at home using a drawing tablet, and I also participate in the digital painting club, so access to the right tools and experience using them wouldn't be an issue.  In game development communication within your team is key. To effectively communicate between members it is very useful to have a singular place where the details of the development process can be laid out. This is where production management software comes into play. This year our teams are using Trello for scheduling objectives for each member and tracking our progress, as well as just general communication.
When I was brainstorming how I wanted to make my outpost my main idea was to have cold-looking, drab architecture that could survive harsh weather conditions. I took a lot of inspiration from looking at actual arctic research stations, a lot of which were in bright colors like red, which I ended up avoiding in my final model. Another difficult decision was the windows, because I was trying to determine whether having all the windows be plain small squares or slot-like like the one on the window, or to have them as they are in the final model below. Ultimately I went with the design below because the simple geometry of the previous design just made me feel like the model was too simple, although I'm still not sure if this was the best choice as the shape of the windows is quite homey in comparison to the rest of the design making them look out of place. One of the aspects that I did have envisioned from the start though was the door, which came out pretty much exactly as I wanted; a heavy-duty steel door with a small, unwelcoming window and a number/lock pad. All in all, this process was a bit tedious due to the modular components since I still need to work on my organization when it comes to modelling, but it could've turned out worse.
For this assignment we had to create a modular house, and while it was quite simple I found myself struggling to keep everything as neat and in order as I would like. Modular design works best when everything can fit together and fall into place like puzzle pieces, but for me my modeling technique was unfortunately a bit sloppy so that was difficult for me to accomplish. This was one of the first activities back in 3DS Max though, and while it wasn't the easiest I was able to remember the keyboard shortcuts fairly quickly and they came back pretty naturally. 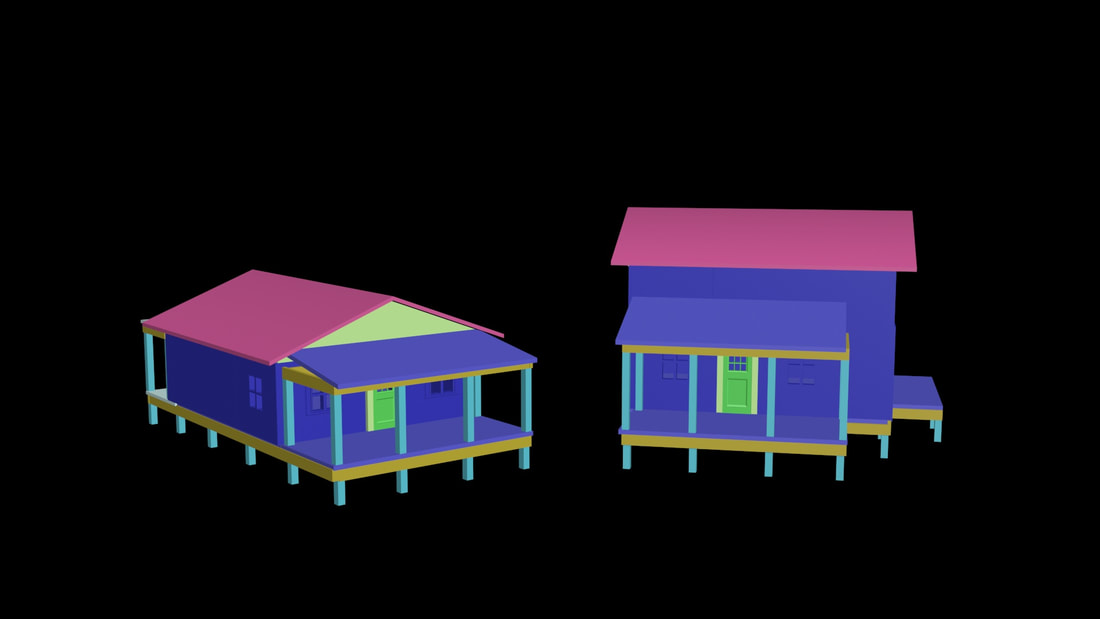 Using snap to vector for translation was new and pretty helpful when it came to getting the positioning of certain components, so that helped getting things aligned to a degree. Although I had this tool though I still ended u[ struggling getting alignment perfect, which is something I'm going to need to work on as I continue to brush up on 3D modeling.
The Junior Programmer Pathway in Unity is a long one, but I learned a lot about programming and the game engine itself. We were taught about the importance of variables in your code, and how they could be applied in the engine (private v. public), and different types of variables such as float, int, bool, etc. We learned how to make objects transform, and cause collisions due to the colliders in Unity. We even touched on audio and animation and how the engine and the IDE work together to bring the game to life. As the pathway went on debugging became easier even though the content got harder, and I found myself looking at hints for these debugging challenges less and less frequently. I became more familiar with C# and was also able to work more quickly as time went on and that familiarity grew. I think anyone who's spent time with any programming language can agree it's always the tiny, (seemingly) insignificant, and unnoticeable errors that are the most frequent and frustrating to deal with. Dealing with these types of mistakes myself made an already lengthy process far longer. Exhibit A: the semi-colon. Below is the script I made this error on, and as you can see there is an if statement under update. After a certain point of cramming programming work you get a bit too comfortable adding semi-colons at the end of lines, so much so that you may accidentally find yourself putting them where they don't belong, without even realizing it. That was the mistake I made when putting a semi-colon after the first line of the aforementioned if statement. This completely ruined my game in Unity, and I was left for 15 minutes attempting to figure out where I went wrong if all of my code looked good. Once I realized what I had done I was left to ponder where I went wrong in a different way.  Aside from this another difficulty I encountered was when we were introduced to tags and how they could be used in scripts. Exhibit B: capitalization. Now, around the same time we were taught how to use tags in Unity and how to make our script recognize them, we were also taught about the GameObject.Find function which used the name of the object in the Unity hierarchy. This shouldn't be any issue as anyone without a smooth, sleep-deprived brain should recognize that the tag you put on an object should have the same name as the object itself so that even if you accidentally mix up the two in your head it wouldn't be a problem. It was a problem for me. If you can see that "Obstacle at the bottom of the script below, you might notice the O is capitalized, which is how I made the tag on the obstacle object in Unity. My mistake was giving the object tag a capital O rather than lowercase, which it was in the hierarchy, then forgetting about it and then conflating object name and object tag even though the function CompareTag was right in front of me. This error, like the previous, wasted a lot of time. 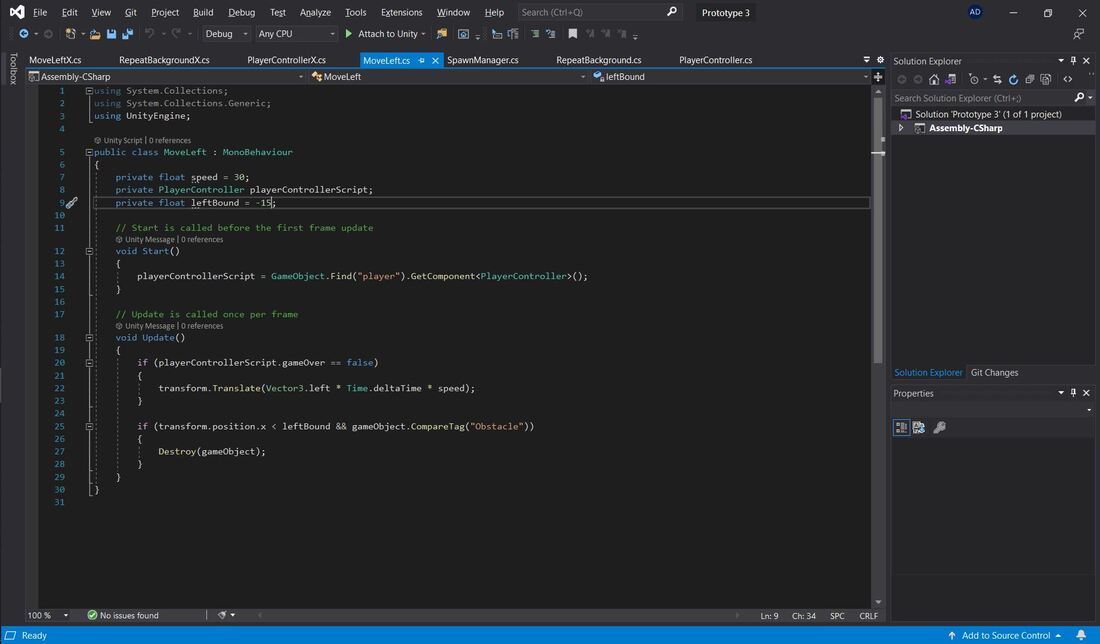 In Summary:
|
About meI am a Senior at DSA and currently taking the Advanced Game Art and Design course. I enjoy playing video games and drawing in my free time. The opinions expressed within this blog are my own, and do not reflect that of Durham School of the Arts of Durham Public Schools Archives
May 2022
Categories
All
|


 RSS Feed
